Isn’t it annoying when you are working on something important and your Windows 10 starts updating itself automatically? The process goes on forever and you can’t do anything other than wait till the installation process is complete. What makes it worse is slow internet connectivity. Make sure you have a high-speed internet connection to update your Windows as it requires a lot of bandwidth. Fortunately for you, we have come up with a solution on how to stop Windows 10 update Permanently.
In Windows 10, the cumulative updates download and install automatically as soon they are available for your desktop. While this feature makes sure your Windows is up to date with all the latest settings and security patches, users all over the world complain about this feature a lot. Every time a new update is available, you have to restart your system to apply the updates. This hampers the workflow and sometimes the new updates cause negative effects. That’s why most users Prefer to Turn off background updates in Windows 10.
If you are not a tech junkie then worry not, our guide on how to turn off automatic updates Windows 10 will help you with the step by step process.
Windows 10 Auto Update Settings
There are 3 main ways with which you can disable auto-updates Win 10. In this Windows 10 guide, we will guide you through every single step so you can learn all the ways to stop Windows 10 Automatic updates.
- Disable Windows 10 Updates using Settings.
- Turn of Windows 10 Updates using group policy.
- Block Windows 10 automatic updates using Registry.
Let’s start with the first step. Make sure to read till the end to learn how to turn off Windows 10 updates.
Disable Windows 10 Updates Using Settings
If you just want to push the automatic update to some other date then it is unnecessary for you to disable auto-update in Win 10. You just have to pause the update settings until you are available to update your windows manually. Using the Windows settings, you can stop Windows 10 updates up to 35 days. This setting is available on both Windows 10 Pro and Windows 10 home.
To disable Automatic updates, follow these steps:
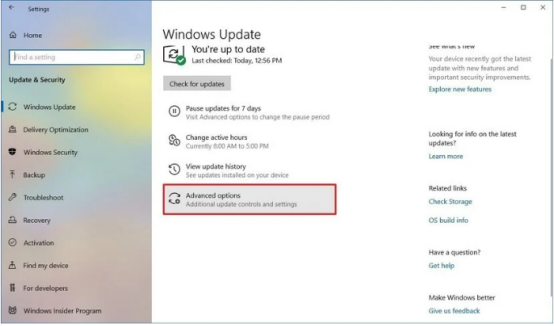
- Open Settings
- Click on Update & Security
- Choose Settings named “Windows Update”
- Click on the “Advanced Options” button
- Under the Pause update section, use the drop-down “pause Until” and choose the date till you want to pause updates.
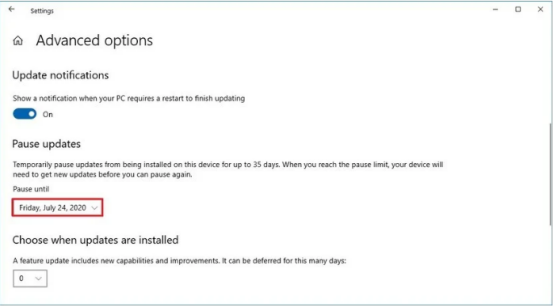
After you save the settings, your computer won’t download and install the updates automatically till the date you have selected.
Turn Off Windows 10 Updates Using Group Policy
With Windows Settings, you can pause updates till a certain number of days. Once the period ends, you will have to repeat the whole step. If you want to learn how to turn off automatic updates in windows 10 permanently then using group policy is the best method. You can use the Local group policy editor to decide whether you want to turn off Windows 10 updates permanently or just limit them as per your preference. Here’s a step by step guide on how to do apply the settings.
Disabling Updates
To disable automatic updates on Windows 10 permanently, follow the steps listed below.
- Click on Start Menu.
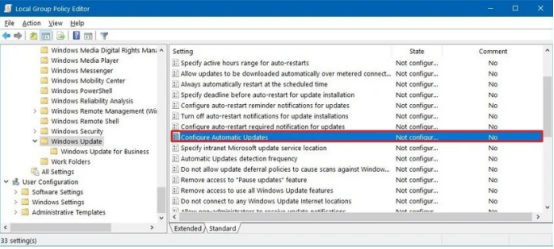
- Search for “gpedit.msc” and select the first option to launch a Group policy editor.
- Follow the path: Computer Configuration > Administrative Templates > Windows Components > Windows Update.
- Double click on “Configure Automatic Updates”

- Check the “Disabled” option to turn off the policy.
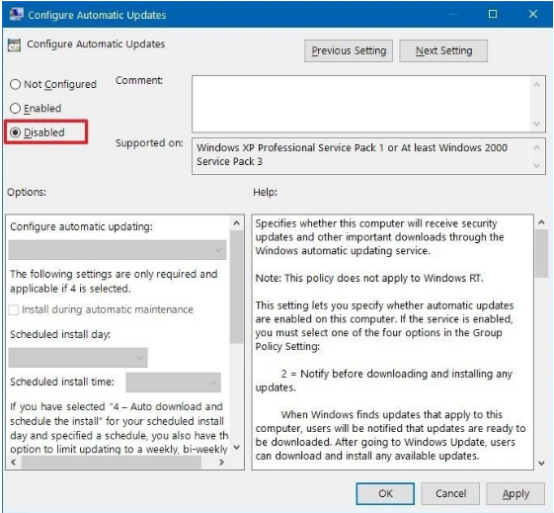
- Click on the Apply Button
- Click on “Ok” button
That’s it, you just disabled Windows 10 automatic updates. Windows will no longer download automatic updates on your computer. You can still download security patches if you want. If you are wondering how to check background updates Windows 10. All you have to do is open Windows update settings and click on “Check for Updates”.
If you want to start the automatic updates of the windows again, follow the same instructions till step 4. On step 5, make sure to select the “Not Configured” option.
Limiting Updates Using Group Policy
If you don’t wish to disable auto-update Win 10 permanently then you can limit the updates that Windows will download. The process is as simple as permanently disabling the Windows 10 Updates.
Follow the steps listed below to limit the updates on Windows 10.
- Click on Start Menu.
- Search for “gpedit.msc” and select the first option to launch a Group policy editor.
- Follow the path: Computer Configuration > Administrative Templates > Windows Components > Windows Update.
- Double click on “Configure Automatic Updates”
- Check the enable option on the Group Policy.
- In the “options” section below you can configure windows automatic updates:
- Notify for download and installation
- Auto download and notify for install
- Auto download and schedule the install
- Allow local admin to choose settings
- Click on the Apply button
- Click on the Ok button
Now whatever settings you have chosen, Windows will download and install the updates in that manner. This is one of the best ways to turn off background updates windows 10.
Block Windows 10 Automatic Updates Using Registry
If you are using Windows 10 Pro then you can disable automatic updates using the registry. Not a lot of people know about these settings so make sure you follow every single step mentioned below.
Before you start the process, you should know that editing Windows Registry is a risky thing and it can cause some irreversible damage to the installation process. We suggest you take a complete backup of your computer before proceeding.
- Open the Start menu.
- Search for “Regedit” and open the top result.
- Navigate to: HKEY_LOCAL_MACHINE\SOFTWARE\POLICIES\MICROSOFT\WINDOWS.
- Right-click on the “Windows” folder and select “New” and then click on “Key” option.
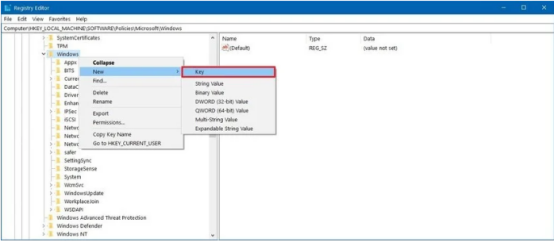
- Name the new key as “Windows Update” and press on enter.
- Right-click on the new key and select new and click on “Key” button

- Name the New key “AU” and press on enter
- Rick click on the right side of the screen and Select “new” and select “DWORD (32-Bit) Value
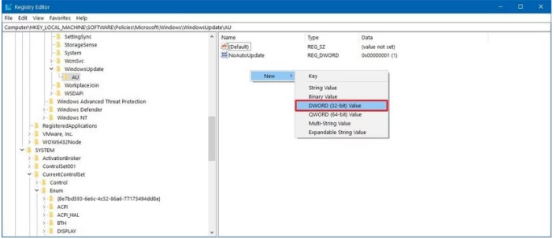
- Name the New Key as “NoAutoUpdate” and hit Enter.
- Double click on the new key and change the value from 0 to 1
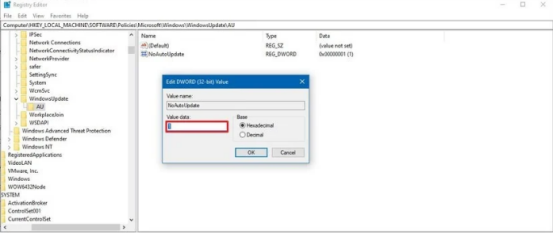
- Click on “Ok”
- Restart your computer to apply changes
The process is complicated so follow every step to depth as even a single error can cause a series of problems for your computer. After you changed the settings, Windows will stop trying to install updates for your Windows 10.
Conclusion: Windows 10 Stop Auto Update Settings
Updating your Windows periodically helps in maintaining health and enhancing user experience. These updates can become really annoying at times. If you are tired of windows updates slowing down your workflow and productivity then follow the steps mentioned above to either pause or to disable Windows 10 update.